

- 首页
- >
- 文章中心
- >
- 树莓派教程
- >
- 树莓派显示屏
- >
- 树莓派DSI/MIPI显示屏
3.5inch RPi LCD (A) 手动配置
在Bullseye 64位系统上使用
安装烧写镜像
请在树莓派官网下载bullseye版本的镜像64bit。
1) 将镜像文件下载到电脑上,并解压得到.img文件。
2) 将TF卡连接到电脑,打开Win32DiskImager.exe软件,选择第1步准备的.img文件,点击write烧写镜像。烧写完成后,打开TF卡所在文件夹。
3) 将waveshare35a.dtbo设备树文件下载解压添加至/boot/overlay文件夹
4) 将TF卡接入到树莓派上,启动树莓派,登录树莓派的终端(可以将树莓派接到HDMI显示器或用ssh远程登录)。
配置驱动文件
打开boot目录下的config.txt文件,注释掉dtoverlay=vc4-kms-v3d,并在[all]末尾添加
dtparam=spi=on
dtoverlay=waveshare35a

hdmi_force_hotplug=1
max_usb_current=1
hdmi_group=2
hdmi_mode=1
hdmi_mode=87
hdmi_cvt 480 320 60 6 0 0 0
hdmi_drive=2
display_rotate=0
配置触摸
在终端运行以下语句:
sudo apt-get install xserver-xorg-input-evdev
sudo cp -rf /usr/share/X11/xorg.conf.d/10-evdev.conf /usr/share/X11/xorg.conf.d/45-evdev.conf
sudo apt-get install xinput-calibrator
sudo nano /usr/share/X11/xorg.conf.d/99-calibration.conf
在99-calibration.conf文件中增加以下语句:
Section "InputClass"
        Identifier      "calibration"
        MatchProduct    "ADS7846 Touchscreen"
        Option  "Calibration"   "3932 300 294 3801"
        Option  "SwapAxes"      "1"
        Option "EmulateThirdButton" "1"
        Option "EmulateThirdButtonTimeout" "1000"
        Option "EmulateThirdButtonMoveThreshold" "300"
EndSection
运行FBCP移植
此过程需要联网
sudo apt-get install cmake
wget https://www.waveshare.net/w/upload/6/66/Rpi-fbcp.zip
unzip Rpi-fbcp.zip
cd rpi-fbcp/
mkdir build
cd build/
cmake ..
make
sudo install fbcp /usr/local/bin/fbcp
设置开机自启动
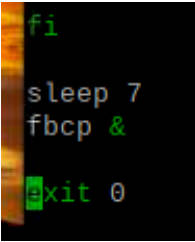
sudo nano /etc/rc.local
在末尾exit 0前添加以下语句:
sleep 7
fbcp &
sudo reboot 重启后屏幕即可正常显示
在Bookworm系统上使用
对于Raspberry pi4 & Raspberry pi5
下载编译安装fbcp
打开树莓派终端,执行:
sudo apt install libraspberrypi-dev -y
sudo apt-get install unzip -y
sudo apt-get install cmake -y
sudo wget https://www.waveshare.net/w/upload/0/03/Waveshare35a.zip
sudo unzip ./Waveshare35a.zip
sudo cp waveshare35a.dtbo /boot/overlays/
sudo wget https://www.waveshare.net/w/upload/6/66/Rpi-fbcp.zip
sudo unzip ./Rpi-fbcp.zip
cd rpi-fbcp/
sudo rm -rf build
sudo mkdir build
cd build
sudo cmake ..
sudo make -j4
sudo install fbcp /usr/local/bin/fbcp
编辑config.txt文件
sudo nano /boot/firmware/config.txt
屏蔽下图对应的语句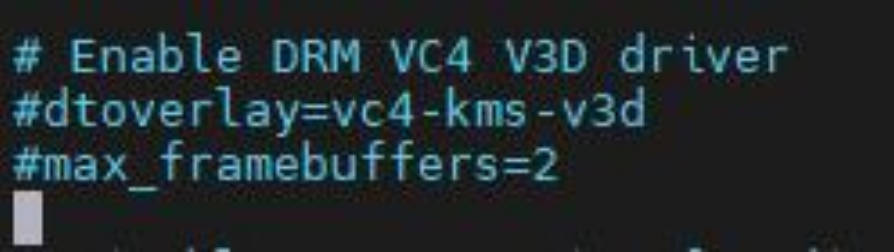
在config.txt最后加入以下代码
dtparam=spi=on
dtoverlay=waveshare35a
hdmi_force_hotplug=1
max_usb_current=1
hdmi_group=2
hdmi_mode=1
hdmi_mode=87
hdmi_cvt 480 320 60 6 0 0 0
hdmi_drive=2
display_rotate=0
设置开机自启动
- 打开.bash_profile文件,如果没有.bash_profile文件则自己创建一个
sudo nano ~/.bash_profile
把以下代码加到.bash_profile文件最下面
if [ "$(cat /proc/device-tree/model | cut -d ' ' -f 3)" = "5" ]; then
    # rpi 5B configuration
    export FRAMEBUFFER=/dev/fb1
    startx  2> /tmp/xorg_errors
else
    # Non-pi5 configuration
    export FRAMEBUFFER=/dev/fb0
    fbcp &
    startx  2> /tmp/xorg_errors
fi
- 打开99-fbturbo.~文件,若已经存在此文件需要确认fb为fb0
sudo nano /usr/share/X11/xorg.conf.d/99-fbturbo.~
把以下内容加到99-fbturbo.~配置文件中
Section "Device"
        Identifier      "Allwinner A10/A13 FBDEV"
        Driver          "fbturbo"
        Option          "fbdev" "/dev/fb0"

        Option          "SwapbuffersWait" "true"
EndSection
设置CLI自动登录
sudo raspi-config nonint do_boot_behaviour B2
sudo raspi-config nonint do_wayland W1
sudo reboot
Note1:确保树莓派的用户名为pi否则无法正常自动登录
Note2:设置上述所有配置后,系统每次重启期间都会变久一点,SSH也需要等待一会儿才能进入;
配置触摸
- 安装calibrator软件
sudo apt-get install xserver-xorg-input-evdev
sudo cp -rf /usr/share/X11/xorg.conf.d/10-evdev.conf /usr/share/X11/xorg.conf.d/45-evdev.conf
sudo apt-get install xinput-calibrator
- 编辑99-calibration.conf配置文件
sudo nano /usr/share/X11/xorg.conf.d/99-calibration.conf
把以下内容加到99-calibration.conf配置文件中
Section "InputClass"
        Identifier      "calibration"
        MatchProduct    "ADS7846 Touchscreen"
        Option  "Calibration"   "3932 300 294 3801"
        Option  "SwapAxes"      "1"
        Option "EmulateThirdButton" "1"
        Option "EmulateThirdButtonTimeout" "1000"
        Option "EmulateThirdButtonMoveThreshold" "300"
EndSection
重启后生效
sudo reboot
对于所有树莓派版本
此方法必须是基于bookworm-lite版本操作,64位 lite、32位 lite
下载必要的软件
- 更新系统
sudo apt update && sudo apt upgrade && sudo apt full-upgrade -y
- 安装xorg服务
sudo apt-get install --no-install-recommends xserver-xorg -y
sudo apt-get install --no-install-recommends xinit -y
- 安装桌面管理器
sudo apt install lightdm -y
- 安装树莓派官方GUI
sudo apt install raspberrypi-ui-mods -y
- 安装浏览器(可选)
sudo apt install chromium-browser -y
下载运行驱动
打开树莓派终端,执行:
sudo apt install libraspberrypi-dev -y
sudo apt-get install unzip -y
sudo apt-get install cmake -y
sudo wget https://www.waveshare.net/w/upload/0/03/Waveshare35a.zip
sudo unzip ./Waveshare35a.zip
sudo cp waveshare35a.dtbo /boot/overlays/
sudo wget https://www.waveshare.net/w/upload/6/66/Rpi-fbcp.zip
sudo unzip ./Rpi-fbcp.zip
cd rpi-fbcp/
sudo rm -rf build
sudo mkdir build
cd build
sudo cmake ..
sudo make -j4
sudo install fbcp /usr/local/bin/fbcp
编辑config.txt文件
sudo nano /boot/firmware/config.txt
屏蔽下图对应的语句
在config.txt最后加入以下代码
dtparam=spi=on
dtoverlay=waveshare35a
hdmi_force_hotplug=1
max_usb_current=1
hdmi_group=2
hdmi_mode=87
hdmi_cvt 640 480 60 6 0 0 0
hdmi_drive=2
display_rotate=0
设置自启动startx与fbcp
- 打开.bash_profile文件,如果没有.bash_profile文件则自己创建一个
sudo nano ~/.bash_profile
把以下代码加到.bash_profile文件最下面
if [ "$(cat /proc/device-tree/model | cut -d ' ' -f 3)" = "5" ]; then
    # rpi 5B configuration
    export FRAMEBUFFER=/dev/fb1
    startx  2> /tmp/xorg_errors
else
    # Non-pi5 configuration
    export FRAMEBUFFER=/dev/fb0
    fbcp &
    startx  2> /tmp/xorg_errors
fi
- 打开99-fbturbo.~文件,若已经存在此文件需要确认fb为fb0
sudo nano /usr/share/X11/xorg.conf.d/99-fbturbo.~
把以下代码加到99-fbturbo.~文件里面
Section "Device"
        Identifier      "Allwinner A10/A13 FBDEV"
        Driver          "fbturbo"
        Option          "fbdev" "/dev/fb0"

        Option          "SwapbuffersWait" "true"
EndSection
设置CLI自动登录
sudo raspi-config nonint do_boot_behaviour B2
sudo raspi-config nonint do_wayland W1
sudo reboot
Note1:确保树莓派的用户名为pi否则无法正常自动登录
Note2:设置上述所有配置后,系统每次重启期间都会变久一点,SSH也需要等待一会儿才能进入;
配置触摸
- 安装calibrator软件
sudo apt-get install xserver-xorg-input-evdev
sudo cp -rf /usr/share/X11/xorg.conf.d/10-evdev.conf /usr/share/X11/xorg.conf.d/45-evdev.conf
sudo apt-get install xinput-calibrator
- 编辑99-calibration.conf配置文件
sudo nano /usr/share/X11/xorg.conf.d/99-calibration.conf
把以下内容加到99-calibration.conf配置文件中
Section "InputClass"
        Identifier      "calibration"
        MatchProduct    "ADS7846 Touchscreen"
        Option  "Calibration"   "3932 300 294 3801"
        Option  "SwapAxes"      "1"
        Option "EmulateThirdButton" "1"
        Option "EmulateThirdButtonTimeout" "1000"
        Option "EmulateThirdButtonMoveThreshold" "300"
EndSection
重启后生效
sudo reboot
