3.5inch RPi LCD (F) 使用教程
产品介绍
产品简介
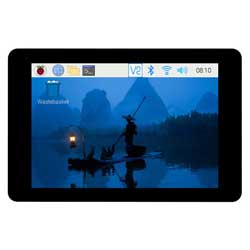
3.5inch RPi LCD (F) 配备320 × 480分辨率的电容触摸屏,支持顶针通信和 GH1.25 13PIN 连接线两种连接方式,并提供树莓派、ESP32、Pico、Arduino等的示例资料。
产品特性
- 320 × 480 分辨率,262K 彩色,能清晰地显示彩色图片
- 触摸屏透过率高,响应快,寿命长
- 内置 ST7796S 驱动芯片和 GT911 电容触控芯片,分别使用 SPI 和 I2C 接口通信,不占用过多接口引脚资源
- 支持顶针通信和 GH1.25 13PIN 连接线两种连接方式
- 采用黑色沉金工艺,美观耐用
- 提供树莓派、树莓派 Pico、ESP32 以及 Arduino 平台的完整例程和开发资料
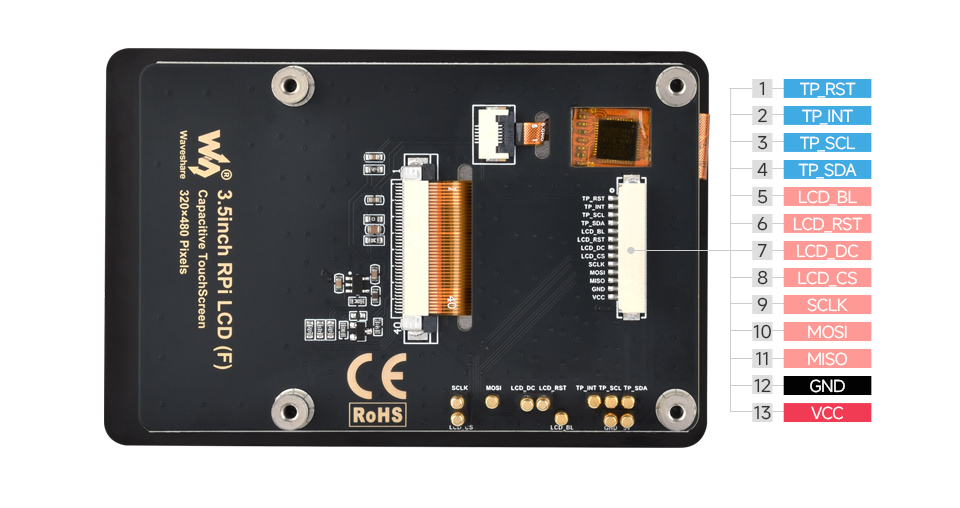
接口介绍
产品尺寸
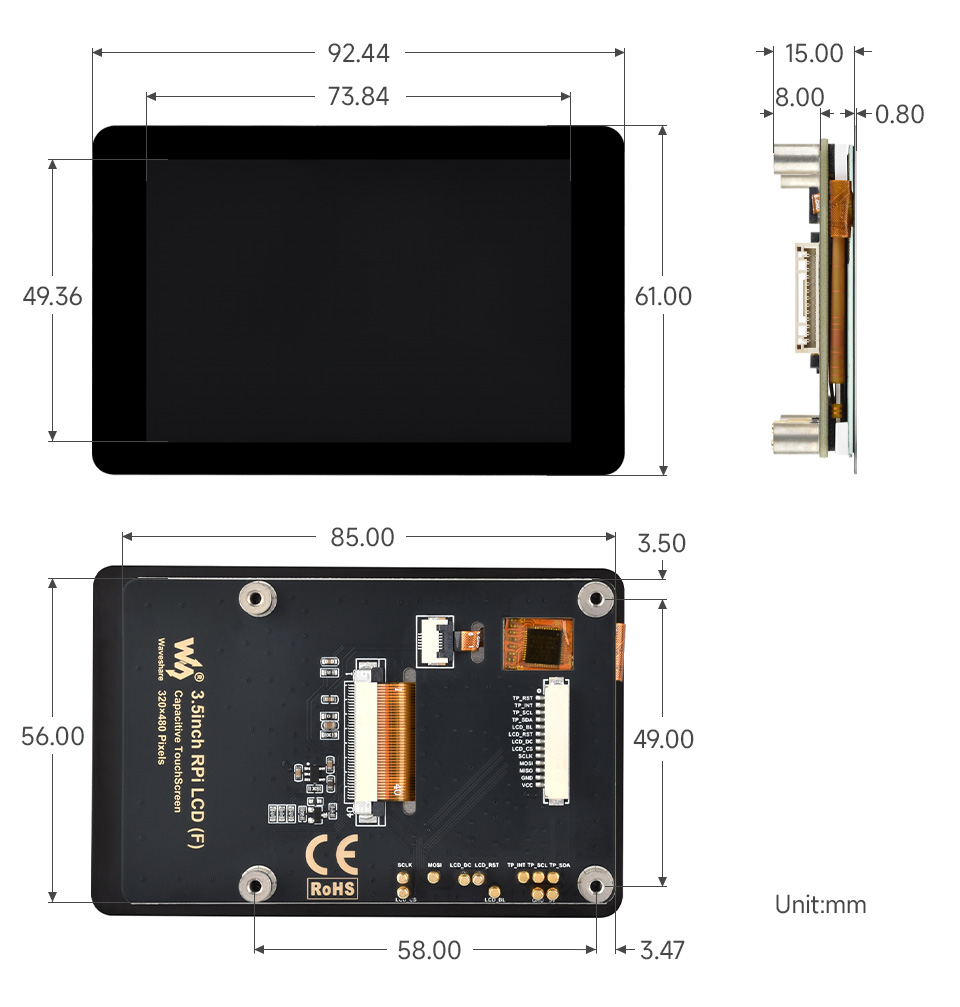
产品参数
| 参数名称 | 参数 |
| 供电电压 | 5V |
| 逻辑电压 | 3.3V |
| 屏幕类型 | IPS |
| 通信接口 | Display :SPI |
| Touch :I2C | |
| 控制芯片 | Display :ST7796S |
| Touch :GT911 | |
| 分辨率 | 320(H) x 480(V) |
| 显示尺寸 | 49.36 (H) x 73.84 (V) mm |
| 产品尺寸 | 61.00(H)x 92.44(V) mm |
Raspberrypi使用教程
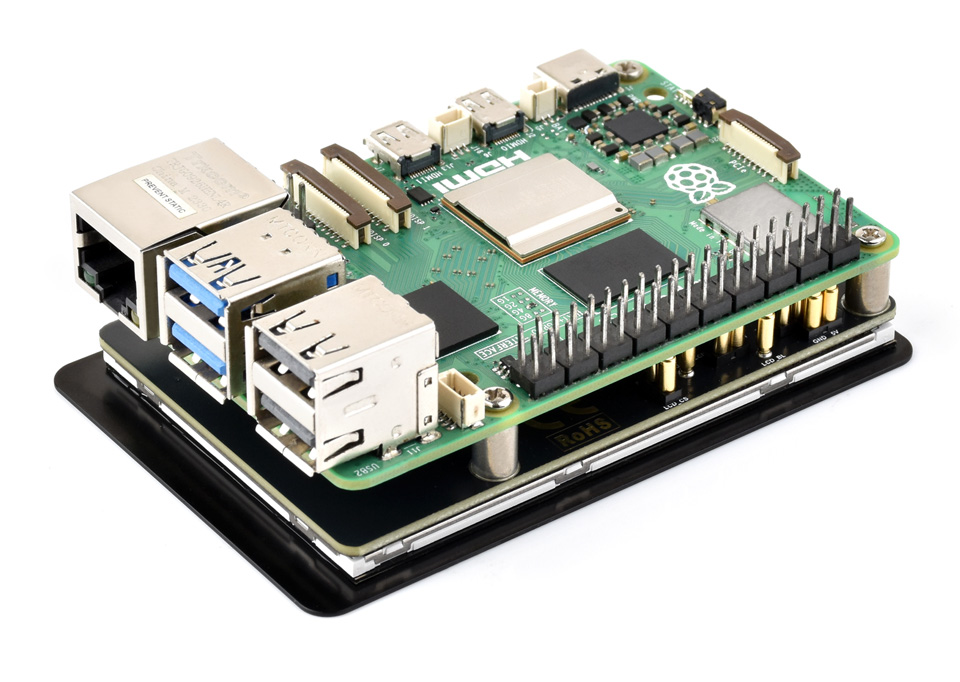
硬件连接
这款产品支持两种连接方式连接到树莓派使用
方法一:通过顶针连接树莓派
方法二:通过杜邦线连接树莓派
| 功能引脚 | BCM编码 | Board物理引脚序号 |
| TP_RST | 17 | 11 |
| TP_INT | 4 | 7 |
| TP_SCL | 3 | 5 |
| TP_SDA | 2 | 3 |
| LCD_BL | 18 | 12 |
| LCD_RST | 27 | 13 |
| LCD_DC | 22 | 15 |
| LCD_CS | 8 | 24 |
| SCLK | 11 | 23 |
| MOSI | 10 | 19 |
| MISO | 9 | 21 |
| GND | GND | 6 |
| VCC | 5V | 4 |
开启SPI与I2C接口
在终端输入以下语句:
sudo raspi-config nonint do_spi 0
sudo raspi-config nonint do_i2c 0
Python 环境
- 安装库
sudo apt-get update
sudo apt-get install python3-pip
sudo apt-get install python3-pil
sudo apt-get install python3-numpy
sudo apt-get install python3-spidev
sudo apt install python3-smbus2
- 下载运行示例程序
wget https://www.waveshare.net/w/upload/d/d1/3inch5_RPI_LCD_F_RPI.zip
unzip 3inch5_RPI_LCD_F_RPI.zip
cd 3inch5_RPI_LCD_F_RPI
sudo python ./main.py
Bookworm系统桌面显示
驱动屏幕
- 在终端输入
wget https://www.waveshare.net/w/upload/d/da/St7796s.zip
unzip St7796s.zip
sudo cp st7796s.bin /lib/firmware/
- 打开config.txt文件
sudo nano /boot/firmware/config.txt
在[all]末尾添加以下语句:
dtparam=spi=on
dtoverlay=mipi-dbi-spi,speed=48000000
dtparam=compatible=st7796s\0panel-mipi-dbi-spi
dtparam=width=320,height=480,width-mm=49,height-mm=79
dtparam=reset-gpio=27,dc-gpio=22,backlight-gpio=18
dtoverlay=goodix,addr=0x5d
- 重启后即可正常点亮触摸屏幕
sudo reboot
旋转屏幕
GUI 界面旋转
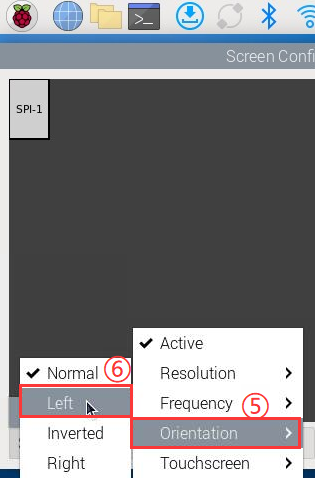
- 1.打开"Screen Configuration"应用程序;
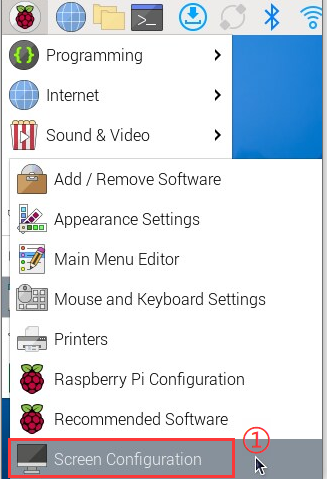
- 2.勾选上"Touchscreen"
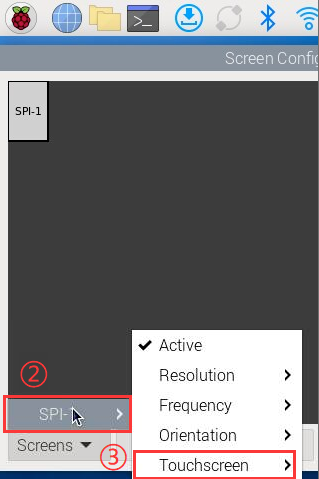
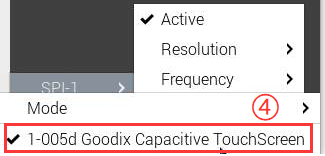
- 3.进入"Screen"->"DSI-1"->"Orientation" ,勾选您需要旋转的方向,最后点击“Apply”,即可完成显示屏和触摸的同步旋转。
lite版本显示旋转
- 安装 wlr-randr 工具
sudo apt install wlr-randr
- 查看输出名称
wlr-randr
输出示例这里以SPI-1设备为例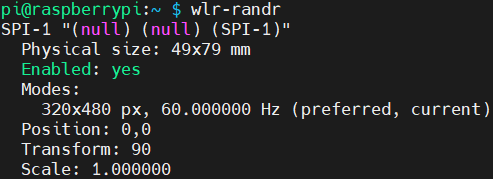
- 执行旋转命令
 wlr-randr --output SPI-1 --transform 90
 #旋转参数可改为normal、90、180、270
调节背光
PWM调光
- 安装WiringPi
cd ~
git clone https://github.com/WiringPi/WiringPi.git
cd WiringPi
./build
gpio -v
安装成功会输出gpio version版本,如下所示: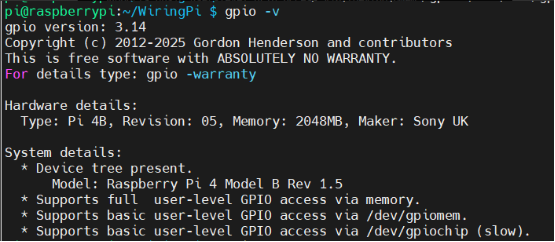
- 手动调节显示器PWM背光
gpio -g mode 18 pwm      	#占用管脚为PWM管脚
gpio pwmc 100   		#设置 PWM 时钟分频器
gpio -g pwm 18 0         	#最暗
gpio -g pwm 18 1023      	#最亮
gpio -g mode 18 out      	#释放为输出
pinctrl调光
- 设置亮屏
sudo pinctrl set 18 op dh
- 设置息屏
sudo pinctrl set 18 op dl
Bullseye系统桌面显示
设置自启动fbcp
- 打开rc.local文件
sudo nano /etc/rc.local
把以下代码加到exit 0前,注意一定要添加"&" 后台运行,否则可能会出现系统不能启动的情况。
sleep 20
fbcp &
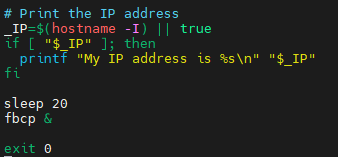
重启后生效
ESP32S3使用教程
本章介绍 ESP32 环境搭建,包括 Arduino IDE、ESP32板管理、相关库的安装,程序编译下载及示例程序测试,帮助用户掌握开发板,便于二次开发。
硬件连接
- 13PIN 杜邦线接口
| LCD引脚 | ESP32S3 |
| VCC | 3V3 |
| GND | GND |
| MISO | GP42 |
| MOSI | GP2 |
| SCLK | GP1 |
| LCD_CS | GP39 |
| LCD_DC | GP41 |
| LCD_RST | GP40 |
| LCD_BL | GP5 |
| TP_SDA | GP15 |
| TP_SCL | GP7 |
| TP_INT | GP17 |
| TP_RST | GP16 |
Arduino环境搭建
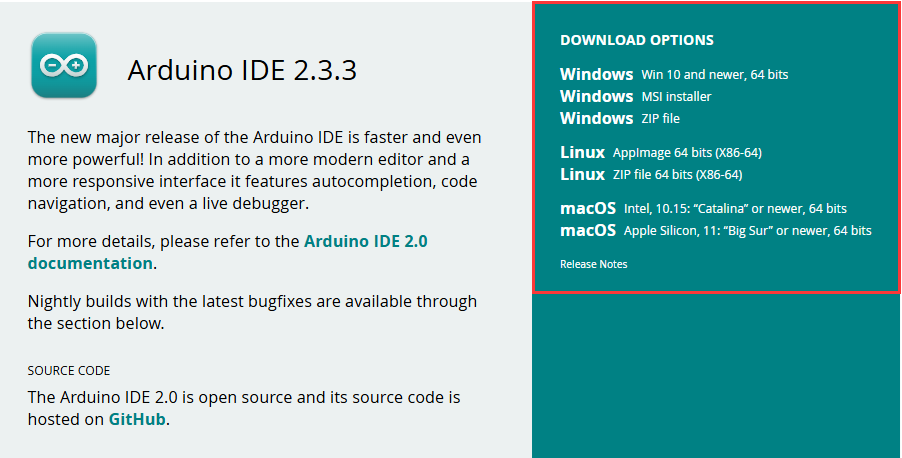
下载和安装 Arduino IDE
- 点击访问Arduino官网,选择对应的系统和系统位数下载。Arduino IDE的版本需要≥1.8,安装的路径不能出现中文,否则编译时会出现错误。
- 运行安装程序,全部默认安装即可。
安装 Arduino-ESP32
- ESP32相关主板在Arduino IDE使用,须先安装“esp32 by Espressif Systems”开发板的软件包
- 根据板安装要求进行安装,一般推荐“在线安装”, 若在线安装失败,则使用“离线安装”
- 安装教程,详见:Arduino 板管理教程
| 板名称 | 板安装要求 | 版本号要求 |
|---|---|---|
| esp32 by Espressif Systems | “离线”安装/“在线”安装 | 2.0.13 |
- 开发板离线包:esp32_package_2.0.13_arduino离线包
- 提取码: wxdz
运行第一个 Arduino 程序
新建工程
- 运行Arduino IDE,选择
File->New Sketch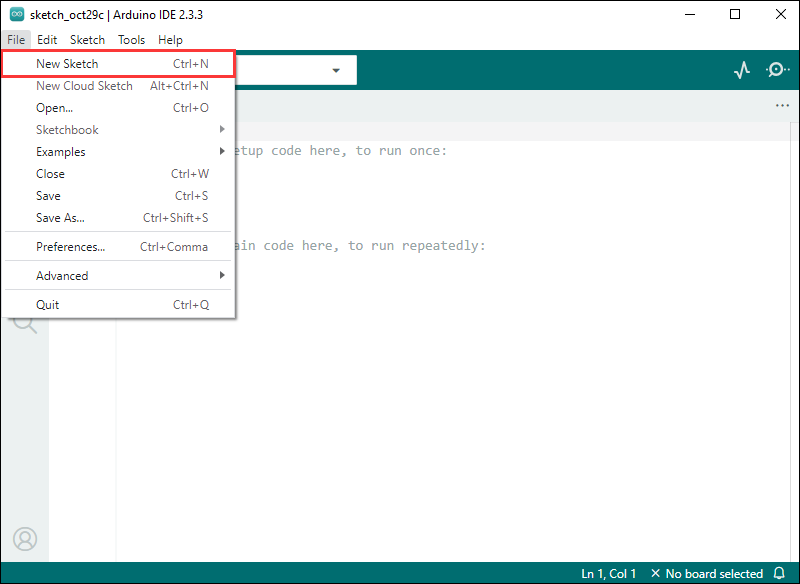
- 输入代码:
void setup() {
  // put your setup code here, to run once:
  Serial.begin(115200);
}

void loop() {
  // put your main code here, to run repeatedly:
  Serial.println("Hello, World!");
  delay(2000);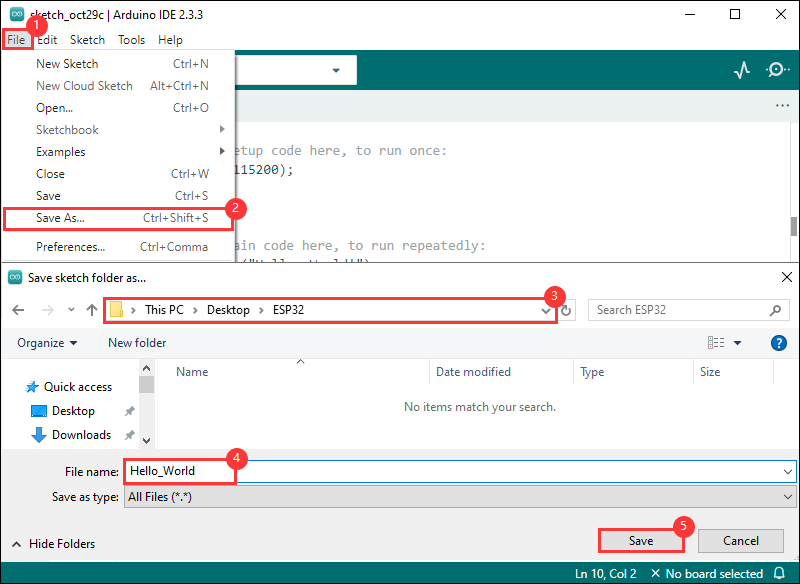
}- 保存代码工程,选择
File->Save As...;在弹出的菜单选择保存工程路径,并输入工程名,如 Hello_World,点击保存
编译和烧录程序
- 选择对应的开发板,以ESP32S3主板为例:
①. 点击选择下拉框选项“Select Other Board and Port”;
②. 搜索需要的开发板型号“esp32s3 dev module”并选择;
③. 选择COM口;
④. 保存选择。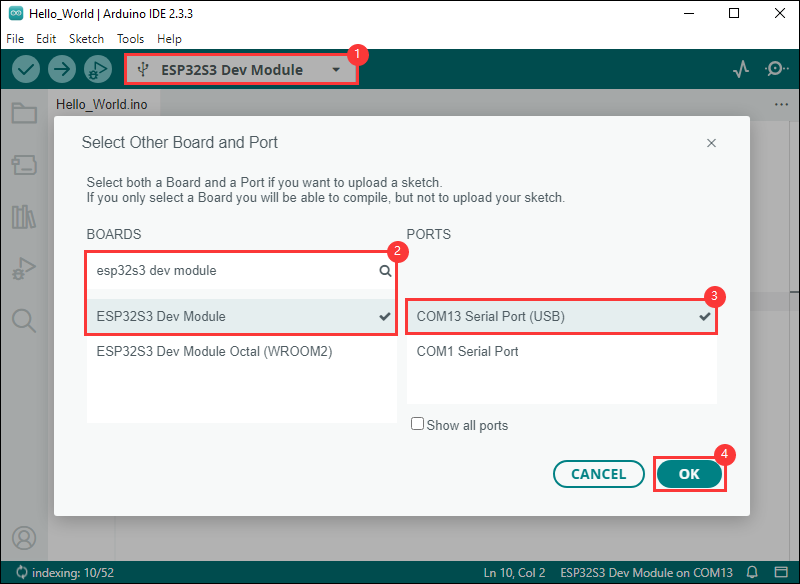
- 若ESP32S3主板只有USB口,须打开(Enable)USB CDC,如下图所示:

- 编译并上传程序:
①. 编译程序;②. 编译并下载程序;③. 下载成功。
- 打开串口监视窗口,程序每隔2秒会打印“Hello World!”,运行情况如下所示:

示例程序
- 下载示例程序,并解压
- 复制libraries文件夹至Arduino的库路径
C:\Users\{用户名}\Documents\Arduino
- 在3inch5_RPI_LCD_F_ESP32S3\examples\main路径双击打开示例main.ino
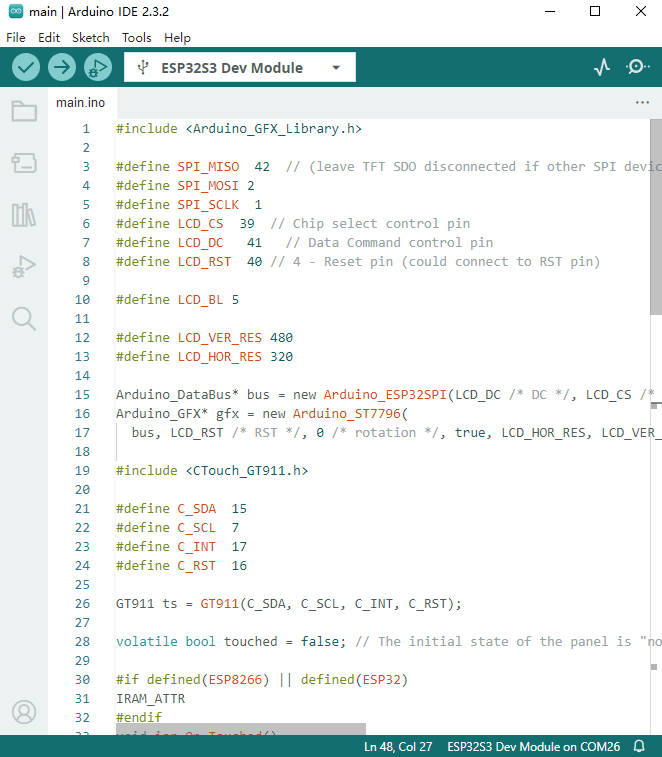
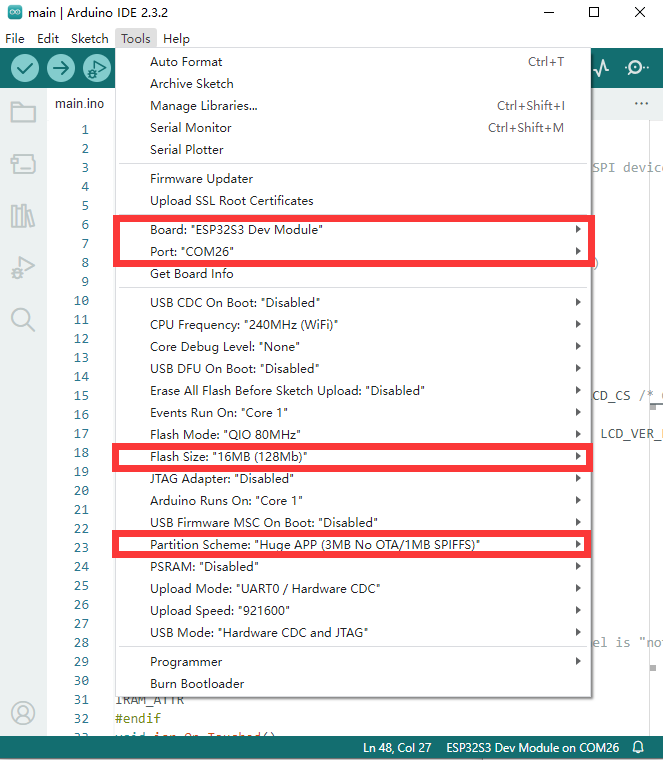
- 根据您的ESP32S3的资源情况选择相应的配置
- 编译并烧录示例
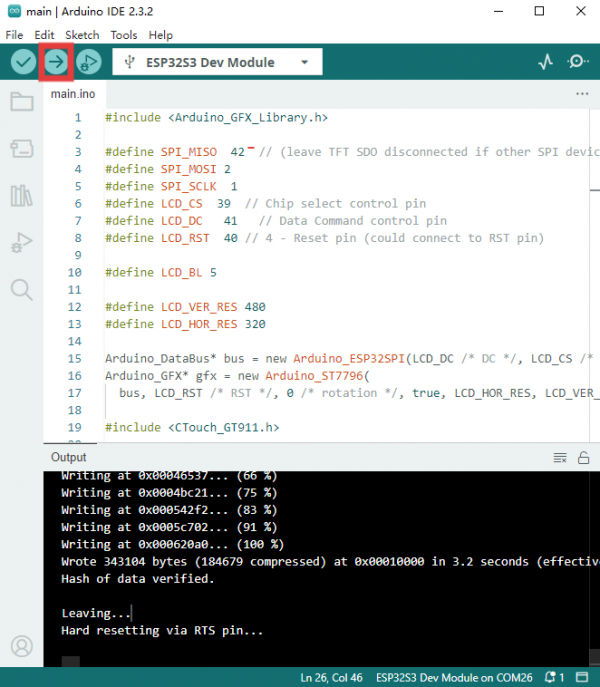
等待烧录完成后,屏幕即可正常显示触摸。
资料
原理图
程序
数据手册
软件
图纸
Retropie 系统使用教程
FAQ
售后
周一-周五(9:30-6:30)周六(9:30-5:30)
手机:13434470212
邮箱:services04@spotpear.cn
QQ:202004841